Introduction to Jupyter Notebooks
Contents
Introduction to Jupyter Notebooks#
You can access all of the content within this book as executable files called Jupyter notebooks. These Jupyter notebooks can be opened through the cloud using Google Colab or Binder, which serves the notebooks in a temporary space. If you would like to try running the notebooks locally on your own computer, you can also download the notebooks and download Jupyter to run them. The easiest way is likely by using Anaconda.
In this section, we will go over the structure of how to navigate and use a Jupyter notebook, as well as provide a short introduction to some concepts in Python. This section is written assuming you have already opened it using Colab or Binder (or downloaded it). You can still look through it without doing the interactive parts, but some of the descriptions of the Jupyter environment won’t make sense.
Jupyter notebooks#
This webpage is called a Jupyter notebook. A notebook is a place to write programs and view their results, and also to write text.
Writing in Jupyter notebooks#
You can use Jupyter notebooks for your own projects or documents. When you make your own notebook, you’ll need to create your own cells for text and code.
To add a cell, click the + button in the menu bar. You can change the cell type by using drop-down menu in the menu bar, and choosing “Code” or “Markdown”. In Colab, you should just see a “+ Text” or “+ Code” option.
Try creating a new cell and putting some text in it.
Markdown (text) cells#
In a notebook, each rectangle containing text or code is called a cell.
Text cells (like this one) can be edited by double-clicking on them. They’re written in a simple format called Markdown to add formatting and section headings. You don’t need to learn Markdown, but you might want to.
After you edit a text cell, click the “run cell” button at the top that looks like a play button or hold down shift + return (or ctrl + return) to confirm any changes. (Try not to delete the instructions of the lab.)
The Kernel#
The kernel is a program that executes the code inside your notebook and outputs the results. In the top right of your window, you can see a circle that indicates the status of your kernel. If the circle is empty (⚪), the kernel is idle and ready to execute code. If the circle is filled in (⚫), the kernel is busy running some code.
In Google Colab, you can look at the Runtime menu item, and also see the usage on the top right of the notebook instead of the filled in or empty circle.
You may run into problems where your kernel is stuck for an excessive amount of time, your notebook is very slow and unresponsive, or your kernel loses its connection. If this happens, try the following steps:
At the top of your screen, click Kernel, then Interrupt.
If that doesn’t help, click Kernel, then Restart. If you do this, you will have to run your code cells from the start of your notebook up until where you paused your work.
If that doesn’t help, restart your server. First, save your work by clicking File at the top left of your screen, then Save and Checkpoint. Next, click Control Panel at the top right. Choose Stop My Server to shut it down, then Start My Server to start it back up. Then, navigate back to the notebook you were working on. You’ll still have to run your code cells again.
Code cells#
Other cells contain code in the Python 3 language. Running a code cell will execute all of the code it contains.
To run the code in a code cell, first click on that cell to activate it. It’ll be highlighted with a little green or blue rectangle. Next, either press ▶| or hold down shift + return or ctrl + return. Using shift + return will take you to the next cell, while using ctrl + return will keep you in the same cell.
Try running this cell:
print('Some text')
Some text
I personally dislike using “Hello, world” as the first piece of code to write. You can feel free to try printing “Hello, world” though.
Exercise: Try printing out some thing else. While we won’t need use the print function to see the output most times, it can still be useful later on, when we want to diagnose issues with our code.
Errors#
Python is a language, and like natural human languages, it has rules. It differs from natural language in two important ways:
The rules are simple. You can learn most of them in a few weeks and gain reasonable proficiency with the language in a semester.
The rules are rigid. If you’re proficient in a natural language, you can understand a non-proficient speaker, glossing over small mistakes. A computer running Python code is not smart enough to do that.
Whenever you write code, you’ll make mistakes. When you run a code cell that has errors, Python will sometimes produce error messages to tell you what you did wrong.
Errors are okay; even experienced programmers make many errors. When you make an error, you just have to find the source of the problem, fix it, and move on.
We have made an error in the next cell. Run it and see what happens.
print("This line is missing something."
  Cell In[2], line 1
    print("This line is missing something."
                                           ^
SyntaxError: unexpected EOF while parsing
Note: In the toolbar, there is the option to click Run > Run All Cells, which will run all the code cells in this notebook in order. However, the notebook stops running code cells if it hits an error, like the one in the cell above.
You should see something like this (minus our annotations):
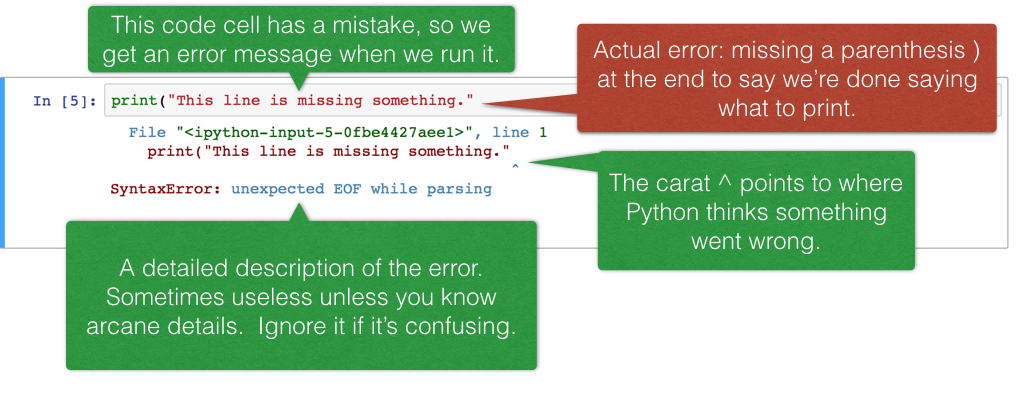
The last line of the error output attempts to tell you what went wrong. The syntax of a language is its structure, and this SyntaxError tells you that you have created an illegal structure. “EOF” means “end of file,” so the message is saying Python expected you to write something more (in this case, a right parenthesis) before finishing the cell.
There’s a lot of terminology in programming languages, but you don’t need to know it all in order to program effectively. If you see a cryptic message like this, you can often get by without deciphering it. (Of course, if you’re frustrated, ask a neighbor or a staff member for help.)
Exercise: Try to fix the code above so that you can run the cell and see the intended message instead of an error.
Expressions#
You can use Python to do simple arithmetic operations, such as addition, subtraction, multiplication, and so on.
2 + 2
2 * 4
10/2
3**2 # This is exponentiation
# Parentheses work the same way
(3 + 2) * 5
Note the text that came after the # symbol above. This is called “commenting”. Python ignores anything that comes after the # symbol, and it’s so it’s a useful way to make notes in your code. This is especially useful for when you want to look back at code later, so I highly recommend you comment any code you write!
Calling functions#
The most common way to combine or manipulate values in Python is by calling functions. Python comes with many built-in functions that perform common operations.
For example, the abs function takes a single number as its argument and returns the absolute value of that number. The absolute value of a number is its distance from 0 on the number line, so abs(5) is 5 and abs(-5) is also 5.
abs(-5)
Exercise: Find the value of the expression: $\(\frac{|79-54|+ |54-74|}{2} + (45 - 41)^2 \)$
print is another example of function that we’ve already used. We’ve used a string object as its argument before, but we can also use other types of objects.
print(5)
Another useful function that you might use throughout the course is type. It shows what kind of variable something is.
type(5) # This is an integer
type('text') # This is a string
Names#
In Python, we use assignment statements to give a name to an expression. An assignment statement has a name on the left side of an = sign and an expression to be evaluated on the right.
ten = 3 * 2 + 4
When you run that cell, Python first computes the value of the expression on the right-hand side, 3 * 2 + 4, which is the number 10. Then it assigns that value to the name ten. At that point, the code in the cell is done running.
After you run that cell, the value 10 is bound to the name ten:
ten
Note that ten isn’t special by any means. We just named it that because it was more descriptive. We could have just as easily used a different name.
number = 3 * 2 + 4
number
We can also include multiple lines of code in one cell, and work with the objects that we’ve created.
number = 5
doubled = number * 2
doubled
Here, we are assigning 5 to number. Then, we multiple what’s in number and assign that to doubled. Finally, we look at the output by simply typing out doubled by itself on a line.
Suppose we wanted to see what would happen if we doubled 10. How would you change the above code to show this? Try it out yourself.
Exercise: What if you wanted an easy way to calculate the area of a circle using just its radius. How might you code this?
Python Packages#
There’s all sorts of functions and tools people have developed using Python. To avoid having to recreate all of these, people put these useful tools inside packages, which we can bring into Python and use.
The main one we’ll be using in this book is pandas. We’ll also frequently use numpy, which stands for Numerical Python, and has many useful computational tools. To bring in a package, we can use the import statement.
import numpy as np
You don’t see any output above, but it imported the NumPy package. Note that we used as np at the end. This means that whenever we want to use a function or object from the NumPy package, we need to put np. in front of it. For example, NumPy comes with an object that has the value of pi.
np.pi
Exercise: Try using this value of pi to adjust the calculation of the area of a circle from above.